BUILDING A ROUTER TABLE – PART THREE
Installing the insert plate
The perimeter cut
I chose to fit the Trend phenolic insert plate, which is stocked by Wealden under Part No. SPR001. The plate measures 306mm x 229mm x 9.5mm. It comes complete with ‘corner snuggers’ which take up any slack if you cut the aperture a bit on the big side, and levelling screws to bring your plate absolutely flush with the top of the table. The suggested table top thickness for this plate is 19mm. Mine is 31mm thick. The only effect this has on fitting the plate is that the holes for the levelling screws have to be counter-bored from the underside. We shall deal with this when installing the levelling system.
One benefit of making your own table is that you can position the insert plate wherever you like – it does not have to be plumb centre. I choose to offset my plates a little to left of centre and a little behind centre. There are two reasons for this:
- On a router table the work is fed from right to left, so setting the plate left of centre gives you a longer run-in, which is rather more important than the run-out. With the plate also set to the rear of centre you are using more of the top, which is important when machining largish panels such as doors.
- One of my routing devices is the Incra Jig, which runs on a long carriage. The extra space to the right of my router gives me more scope for positioning the Incra fence.
When you have decided where to position your insert plate, lay it on the table top and draw round it with a sharp pencil. Alternatively draw the rectangle to the given dimensions. Now take four straight edges cut from 18mm MDF. If you are not used to working with straight edges you will be amazed at the number of jobs made easier with their use, so pausing to make them is a valuable investment in workshop aids.
Tape the straight edges around the rectangle drawn on the table top, using double-sided tape. Don’t overdo the tape; if you do the hardest part of the job will be freeing the straight edges from the top after cutting. Try the plate for fit inside the straight edges and if necessary reposition one or more of them until the plate fits comfortably in the rectangle with only the merest hint of movement.

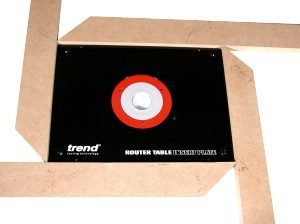
Photo 8 shows the four straight edges taped in place around the insert plate.
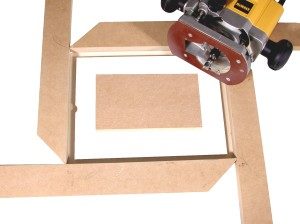
Now take a piece of the same thickness (18mm) MDF and tape it in the centre of the rectangle to provide a stable surface for the router to run on. Leave about 45mm space between the packing piece and the straight edges.
You are going to cut a 1/2″ wide groove, 1/4″ deep, around the inside of the straight edges. In fact cut the groove a tiny bit deeper than the specified 1/4″. You can always shim the plate to bring it absolutely flush with the table top, but with this plate you have a levelling system anyway. Fit a short 1/2″ diameter template trim cutter Wealden T8027B to your router and take no more than 3 – 4 mm for the first pass. The 1/2″ cutter will give the correct radius for the corner and the correct width for the rebated edge of the plate.
Now with the router plunged enough to bring the bearing against the straight edges switch on, plunge, and make the pass in a clockwise direction around the rectangle. The system is ‘fail safe’; if you come away from the straight edges you will be in the waste and simple have to repeat the pass. This first pass is likely to be hard work since you are cutting through the Formica and the adhesive. The second pass to full depth is easier.
Note the relationship between the thickness of the straight edges and the length of the cutter. It must be possible to plunge the router so that the bearing runs against the straight edge without exceeding the required depth of cut. If you cutter is longer than the one specified above you will need thicker straight edges.

Photo 9 shows the perimeter cut completed. The edges of the insert plate will sit on this rebate. Note that the semi-circular cut by the left hand edge is where I plunged the router away from the straight edge and then cut in until the bearing was running on the straight edge.
