WHAT TO LOOK FOR IN A ROUTER TABLE – PART ONE
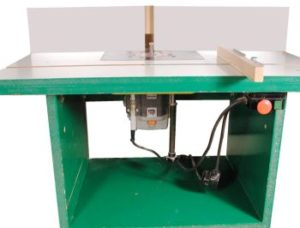 For most workers the biggest single step forward in expanding the scope of their routing is to buy or build a router table. With the router stationary, many of the larger heavier cutters can be used, although a heavy-duty router with ½” collet and variable speed is necessary. At the other extreme miniature work, such as would be done with the Wealden miniature and modelling bits, needs a table because of the tiny dimensions of the timber and the extreme accuracy required. Other advantages of table routing are that it is less stressful, it is easier to rout small workpieces, and dust extraction is more efficient. All these factors combine to make table routing safer and more accurate, in general, than hand-held routing.
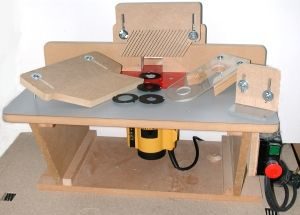
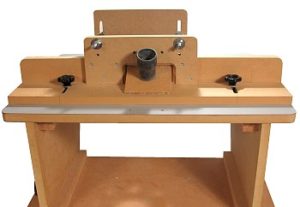
In this and the next instalment I discuss the main criteria for choosing a table – whether bought or home-made. Photo 1 shows my big table and photo 2 my small table with guards and hold-downs.
Price
Price is obviously important, but it is far from being the overriding consideration. Paying more will not necessarily give you a better table for your requirements. At the other extreme, if you are on a limited budget, I am quite certain that you will get far more for your money by making your own table.
 Size
Size
With router tables the old boxing adage “a good big ‘un will always beat a good little ‘un” holds true. This applies to the router and the table it is put in, because a table-mounted router will tend to be used with large cutters applied to large workpieces. In addition, the router will be worked non-stop for longer stretches at a time. Unless you are limiting yourself to light cabinet and miniature work, therefore, a large solid table top, at a height to suit the user, is the first requirement. Stability is the next important factor. A heavy top on a flimsy base does not make for accurate work.
 Material of top
The essential requirement of a router table top is that it should be flat and stay flat. The material that it is made of is less important, unless you have to drill it to fit your router. Materials used for commercial tables include phenolic board, plastic-faced MDF, alloy, sheet steel, and cast iron. For large home-made tables I use two layers of 18mm MDF laminated both sides with Formica or similar. For smaller tables, a single thickness of 18mm MDF, laminated both sides, suffices.
Bought-in items
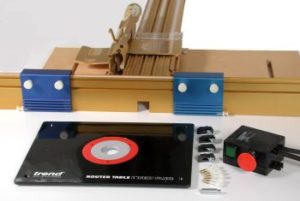
Certain commercially-available items improve the table and make its construction easier. An obvious example is a No Volt Release (NVR) switch which is not only a safety device but also a great convenience. Other examples include a router insert plate, a mitre fence if you want one and, perhaps, a precision fence. Photo 3 shows examples of bought-in items.
 The base
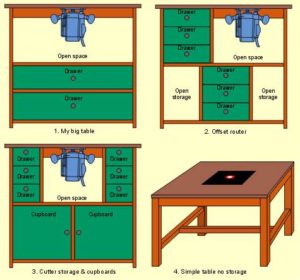
The more stable a router table the better. For floor-standing models I use 25mm thick chipboard for all components except the drawer sides and backs, for which I use 12mm MDF. The base can be in one of a number of styles. I made my big table with a two-drawer base but there are numerous alternatives. The diagram shows my base plus some of the other options. For a bench-mounted model I make a very simple base from 18mm MDF. The main thing to remember here is that the sides should be high enough to give comfortable clearance for your router when it is un-plunged.
 Fences and guards
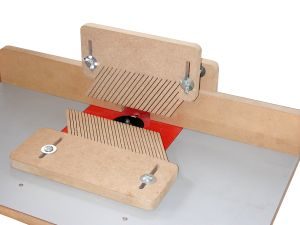
The fence tends to be the weak link of a router table since most lack precise adjustment. A good fence will have adjustable sliding cheeks to allow for different cutter diameters, suitable guards and hold-downs (which are often optional extras at additional cost) and a dust extraction take off point. Ideally it would also have a precise positioning system so that it can be moved and returned exactly to its previous setting. Such fences are rare, although a few commercial ones come close. For optimum accuracy, you have to look for specialised systems such as the Incra. Under the heading “Fences” we can consider the provision of a mitre fence. I am not a great fan of mitre fences. Anything they can do can be done by other means and when using them, it is usually necessary to align the table fence parallel with the mitre fence slot. This requires an additional adjustment and creates an additional source of error. Furthermore, the cutting of a slot in a table top made of MDF can cause distortion, even with an alloy channel in the slot. Guards should include vertical and horizontal pressure guards. Vertical guards are more common than horizontal ones on commercial tables. They are usually attached to the fence. Commercial horizontal guards are usually fixed in the mitre fence slot; in home-made tables pronged T-nuts or T-slots in the table top are used. Photo 2 above shows the guards and hold-downs made for my small table and photo 4 a close-up of the vertical and horizontal pressure guards in place.
 Dust extraction
With router tables, dust extraction generally goes with the fence and is much more efficient than with hand-held routing. With most tables, however, when the fence is removed e.g. for pattern routing with bearing-guided cutters, the dust extraction goes with it. This is not a satisfactory state of affairs and with my home-made tables I make the necessary fitments to restore guards and dust extraction. These are shown in photo 2 above while photo 5 shows a rear view of the fence on my small table with the dust-extraction take-off and carrier for the vertical guards.
